


Post by deeno on Oct 24, 2006 12:33:49 GMT -8
I've finally used this thing long enough to where I feel comfortable sharing my opinion on it. For starters though, here's an installation walk through as the instructions that I got from Qloader didn't have any pictures. You'll want your official qloader manual nearby to use as a reference for things like how to wind the qpods, etc.
This is optional, but I recommend covering your SP-8 feed tube with electrical tape before beginning. This will give all of the mounting pieces some extra grip to help eliminate unwanted rotating.
Step 1:
Install the Qloader mounting bracket as shown below

At this point, you'll want to tighten it enough to where it won't rotate on it's own, but tight enough that you can rotate it by hand.
Step 2:
Put the SP-8 mod mounting clamp on the end of the feed tube. You'll want to orient the two tabs as shown in the picture below. The reason is that you want the matching elbow to be locked in place while pointing towards the mounting socket. As in step one, just make it tight enough so it doesn't wiggle around on its own.
Step 3:
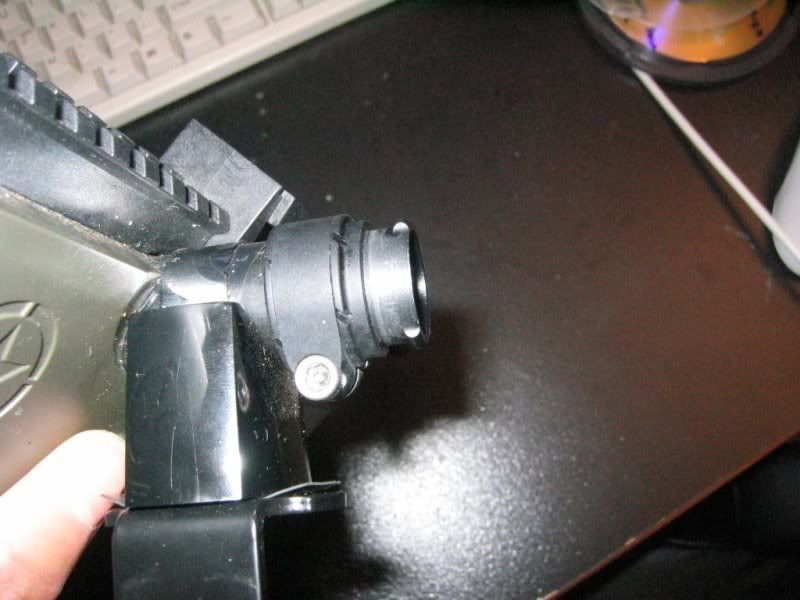
Go ahead and put the elbow onto the SP-8 mod clamp. It should make sense by now why I recommend having the tabs on the clamp oriented in that direction.
Step 4:
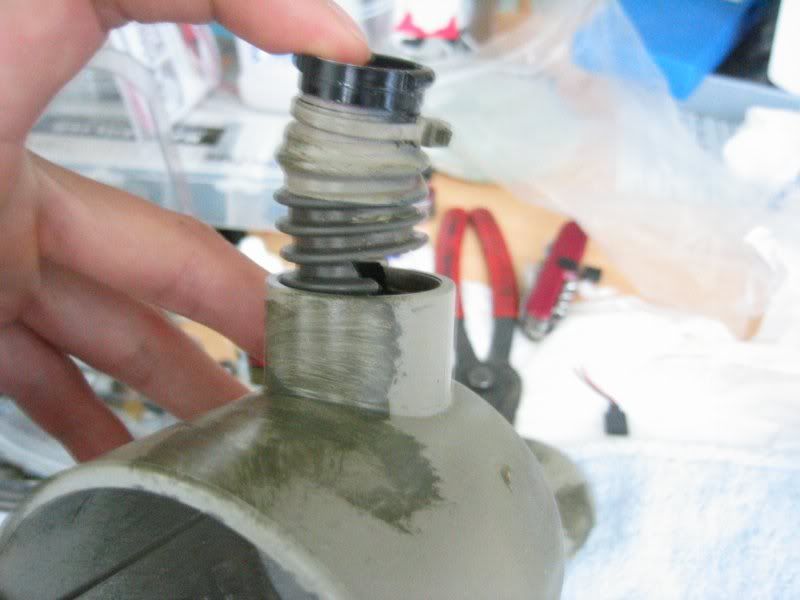
Now put your SP-8 aside and assemble the Qloader mounting socket as shown in the picture.

Don't worry about orings yet as you will be dissasembling this all again. What you want to do is get the feed tube cut to approximately the right length. If you're at a loss for where to start, start with 3 inches. Also just as a warning, the biggest pain is getting the black piece on the right side of the picture into the tube. I recommend heating the feed tube with boiling water and/or putting the black adapter into the freezer for 15 minutes. If you're having trouble, keep at it. We all did. But if you persevere, eventually you'll get it in there. Make sure you don't cut the feed tube too short or you'll be going through this step again.
Step 5:
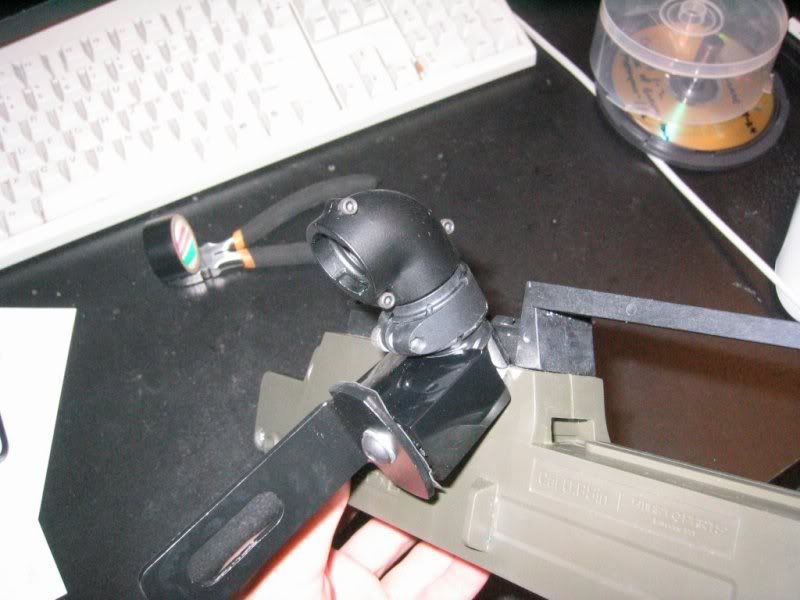
You should be able to insert the adapter into the elbow and lock it in place. At this point it should be pretty clear that your feed tube is too long. Cut a little off at a time or you'll be going through step 4 again. Button it all up as shown in the picture below.
When you have everything angled the way you want it, tear it all down and tighten down the clamp in step one. Make this one real tight as you will be unable to reach this bolt to tighten it later without complete dissasembly. Just bear in mind that the SP-8 feedneck is made of plastic as you crank down on the allen bolt. Go ahead and tighten up the bolt in Step 2 also. You don't want this one moving either. Now put the rest of the pieces together again and it should look something like this when finished:
Now that you have your qloader physically mounted, you're probably about 1/4 way there. Load up a qpod with paint and have a spare 140round pod handy. Here are some tips to help with loading
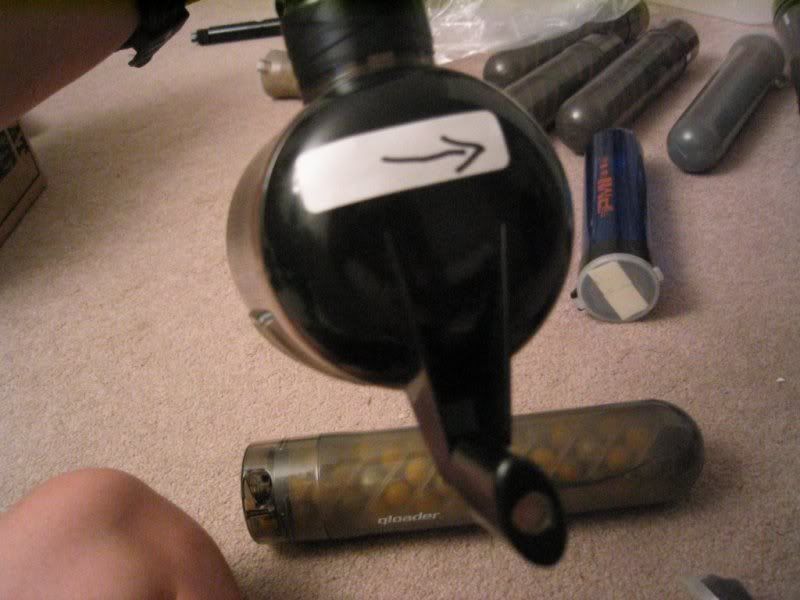
Tip 1) Label the rotation on your qloader crank. I'm an idiot and can never remember which direction to turn the crank, so I labeled it
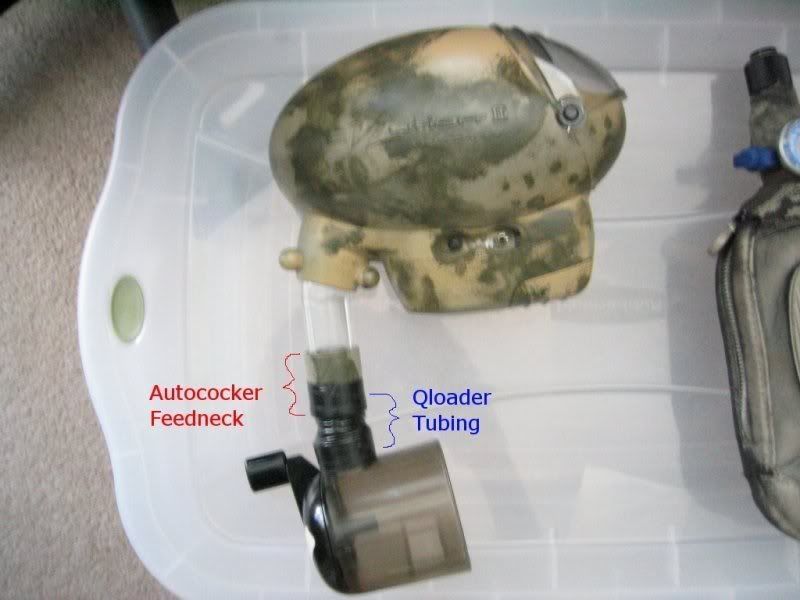
Tip 2) You've probably already read about using an electronic hopper to load instead of the kidney. Well here's how I did it. You can have more tubing in there if you want, but I like mine compact for storage.
Tip 3) I highly recommend working with one qpod at first. Take it apart and wind it up 10 times. You're going to use this as your "template" pod to figure out how much to wind all of the other pods.
Step 6:
Let's see how your set up feeds. I can pretty much guarantee that skipping this step or cutting corners here will lead to frustration on the playing field. This is the step many people skimp on and the source of many Qloader gripes. It's also doubly hard to set up on the SP-8 because the feed tube length is also affected by the angle that you have the feed tube at. More angle (closer to 90deg) will actually shorten the feed tube. A straighter feed tube will be longer. The difference is enough to be the difference between a perfect fit and chopping balls off when you remove the qpod.
Go ahead and start putting paintballs into the feed tube through the qloader socket. Keep putting balls in until it's full (you'll want to make sure that your SP-8 bolt is all the way back as you want a ball to be able to drop into the firing chamber. Airing up your marker is one way to do this). You'll be surprised how many fit in there. Make sure that an even number of balls fit in there. If you have room for half a ball left over, that means half a ball will be hanging into the qloader socket when you go to insert a qpod. This will eventually lead to a crushed/popped paintball when you insert your qpod so trim the qloder tubing down in length until an even number of balls fit into the feed tube. It doesn't need to be perfect yet, but it should be very close. Again be sure not to cut your tube too short or you'll be repeating step 4.
Now that you have the feed tube length correct, we're going to make sure this thing can feed smoothly. This is actually somewhat of a task due to the sharp angle of the qloader mounting socket. What you want to do tear down your SP-8 to the clamshell like mine is in all of the pictures. Take out the breech/firing can so all you have is the empty shell with the qloader attached. Put 1 paintball into the feed tube from the socket side. If you can't get the paintball to fall on it's own all the way through and then out the other side of the feedneck (ie push a ball in where your qpod would be and the ball should drop out where the barrel would be if you turn the whole thing upside down a few times), you need to adjust the angle that your qloader socket is mounted at. Loosen the bolt shown in step 5 and play with this until you can get the ball to feed by itself. Any resistance at all is going to bite you during a game, so take your time and make sure you get this right. Some tricks that I used are to scallop the plastic mounting cup and remove some sections of the feed tube itself to help with feeding. This isn't necessary, but I did it as insurance to really open up the passage for balls to feed through.
When you can get a ball to flop all the way through your setup with just gravity, you're ready to move to the next step.
Step 7:
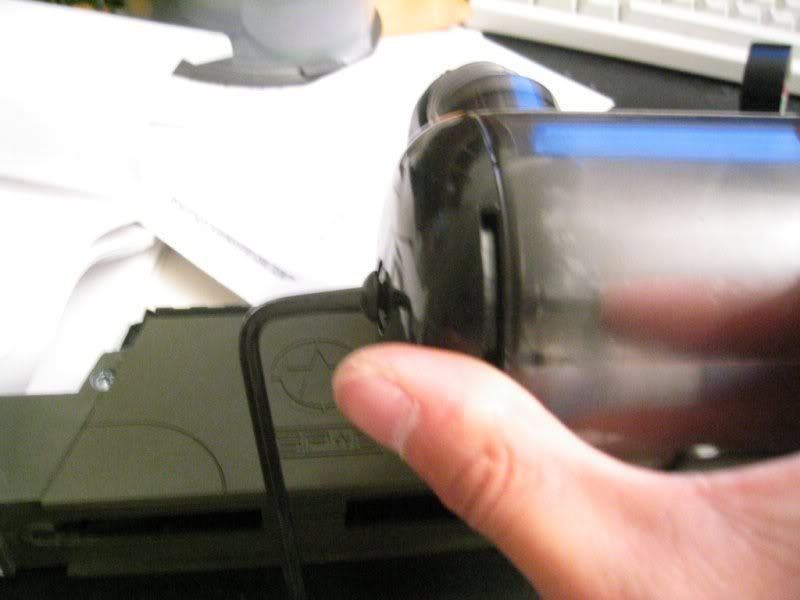
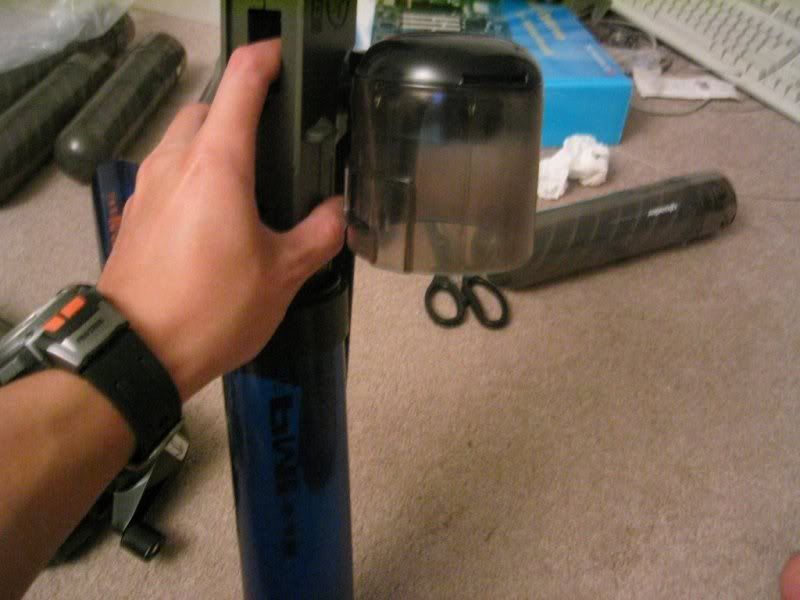
Okay now that you have a qpod full of paintballs and you know your setup is feeding smoothly, we're going to test the feeding of the qloader with paint. Your SP-8 should still be stripped down to just the clamshell and the qloader socket. Grab a spare 140round tube and put the barrel end of your SP-8 clamshell into it. This is to catch the balls as they come out as shown below:
You'll want to stick your index finger over the feed tube like I have mine in the picture. This is to guide the balls downward so they don't get jammed on the SP-8 body and also you don't really want the paint to just feed freely without any resistance. Now insert your pod and the entire qpod should feed smoothly right into the 140round tube.
If it didn't feed freely (ie you get some jams), back to step 6 for you. If it did feed freely, but there are still balls left in your qpod, dissassemble the qpod and add a wind or two then repeat step 7. When you've finally got it feeding so that no more balls are left in your qpod, you have a good starting point for how many winds to wind up all of your pods with.
Step 8:
Now that you have a baseline for number of winds, go ahead and wind up all of your pods with that number of winds (I use 14 myself). Bear in mind that each spring is different so you'll still need to test every single qpod in Step 7. Not doing this step in the convenience of your living room will again just lead to frustration on the field so do it!
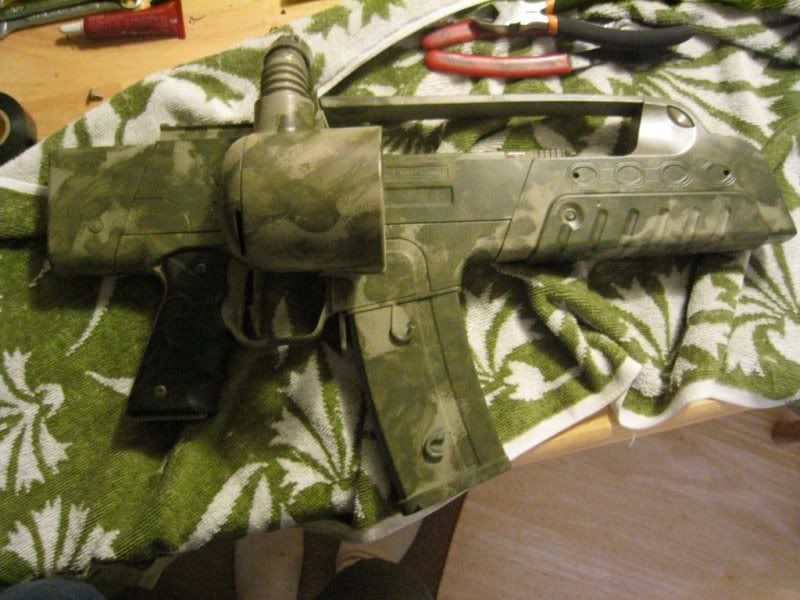
Congrats and enjoy. Add a little paint for that personal touch (optional)
Review
Okay now that we have installation out of the way, onto the review part. I'm going to skip talking about the Qloader itself as there are lots of other reviews out there. What we'll be discussing here is going to be SP-8 mod kit specific only.
When I broke down and purchased this kit, I was afraid of two things.
When I first got it all put together, I noticed that the balance wasn't thrown off at all and in fact, there was much less of a top heavy feeling to the marker (feeling of wanting to rotate when held). During play, the feeling is non-existant, even after trudging around during a long 2 day scenario and the front to rear gun balance is just fine as well. In fact it's a lot better than other markers I've owned/used.
Next I stood in front of a mirror and checked my right hand profile. I was pleased to see that the qpod didn't stick out past my shoulder/elbow even with my arm tucked all the way in. I'm 5'10 ~150lbs and it's about even with my shoulder/arm if I stand with my shoulders as parallel as possible to the line of fire.
In play, having the hopper out of my line of vision is a HUGE improvement. People who are on point will really appreciate the added peripheral vision to the right when you have your gun up as the SP-8 hopper location really blocks a lot of the field of view when your marker is up and leveled. The mounting socket is also rock solid and doesn't rotate at all. I've done all sorts of evil things to the mounting socket (had one guy even step on it momentarily on accident) and it just springs right back to original location and doesn't get twisted or even worse break. Also, many of the complaints of ball breaks or getting hit in the feed tube are nearly non-existant as the feed tube length is so short. If you've wound up your qpods as outlined above, you most likely have the minimum number of winds for every pod and paintball dimpling should be kept to a minimum. I did notice some dimpling so I'm not sure if a qloader setup is all that great for the one shot snipers out there, but for the rest of us it wasn't too severe and it's generally only the balls that remain in the feed tube for a long time that end up dimpled. All in all I think the SP-8 mod kit quality and construction are top notch. As for the qloader itself, the increased field of vision and elimination of having to use a 45deg elbow are HUGE, but the system adds a lot of complexity and may not be for everybody.
This is optional, but I recommend covering your SP-8 feed tube with electrical tape before beginning. This will give all of the mounting pieces some extra grip to help eliminate unwanted rotating.
Step 1:
Install the Qloader mounting bracket as shown below
At this point, you'll want to tighten it enough to where it won't rotate on it's own, but tight enough that you can rotate it by hand.
Step 2:
Put the SP-8 mod mounting clamp on the end of the feed tube. You'll want to orient the two tabs as shown in the picture below. The reason is that you want the matching elbow to be locked in place while pointing towards the mounting socket. As in step one, just make it tight enough so it doesn't wiggle around on its own.
Step 3:
Go ahead and put the elbow onto the SP-8 mod clamp. It should make sense by now why I recommend having the tabs on the clamp oriented in that direction.
Step 4:
Now put your SP-8 aside and assemble the Qloader mounting socket as shown in the picture.
Don't worry about orings yet as you will be dissasembling this all again. What you want to do is get the feed tube cut to approximately the right length. If you're at a loss for where to start, start with 3 inches. Also just as a warning, the biggest pain is getting the black piece on the right side of the picture into the tube. I recommend heating the feed tube with boiling water and/or putting the black adapter into the freezer for 15 minutes. If you're having trouble, keep at it. We all did. But if you persevere, eventually you'll get it in there. Make sure you don't cut the feed tube too short or you'll be going through this step again.
Step 5:
You should be able to insert the adapter into the elbow and lock it in place. At this point it should be pretty clear that your feed tube is too long. Cut a little off at a time or you'll be going through step 4 again. Button it all up as shown in the picture below.
When you have everything angled the way you want it, tear it all down and tighten down the clamp in step one. Make this one real tight as you will be unable to reach this bolt to tighten it later without complete dissasembly. Just bear in mind that the SP-8 feedneck is made of plastic as you crank down on the allen bolt. Go ahead and tighten up the bolt in Step 2 also. You don't want this one moving either. Now put the rest of the pieces together again and it should look something like this when finished:
Now that you have your qloader physically mounted, you're probably about 1/4 way there. Load up a qpod with paint and have a spare 140round pod handy. Here are some tips to help with loading
Tip 1) Label the rotation on your qloader crank. I'm an idiot and can never remember which direction to turn the crank, so I labeled it
Tip 2) You've probably already read about using an electronic hopper to load instead of the kidney. Well here's how I did it. You can have more tubing in there if you want, but I like mine compact for storage.
Tip 3) I highly recommend working with one qpod at first. Take it apart and wind it up 10 times. You're going to use this as your "template" pod to figure out how much to wind all of the other pods.
Step 6:
Let's see how your set up feeds. I can pretty much guarantee that skipping this step or cutting corners here will lead to frustration on the playing field. This is the step many people skimp on and the source of many Qloader gripes. It's also doubly hard to set up on the SP-8 because the feed tube length is also affected by the angle that you have the feed tube at. More angle (closer to 90deg) will actually shorten the feed tube. A straighter feed tube will be longer. The difference is enough to be the difference between a perfect fit and chopping balls off when you remove the qpod.
Go ahead and start putting paintballs into the feed tube through the qloader socket. Keep putting balls in until it's full (you'll want to make sure that your SP-8 bolt is all the way back as you want a ball to be able to drop into the firing chamber. Airing up your marker is one way to do this). You'll be surprised how many fit in there. Make sure that an even number of balls fit in there. If you have room for half a ball left over, that means half a ball will be hanging into the qloader socket when you go to insert a qpod. This will eventually lead to a crushed/popped paintball when you insert your qpod so trim the qloder tubing down in length until an even number of balls fit into the feed tube. It doesn't need to be perfect yet, but it should be very close. Again be sure not to cut your tube too short or you'll be repeating step 4.
Now that you have the feed tube length correct, we're going to make sure this thing can feed smoothly. This is actually somewhat of a task due to the sharp angle of the qloader mounting socket. What you want to do tear down your SP-8 to the clamshell like mine is in all of the pictures. Take out the breech/firing can so all you have is the empty shell with the qloader attached. Put 1 paintball into the feed tube from the socket side. If you can't get the paintball to fall on it's own all the way through and then out the other side of the feedneck (ie push a ball in where your qpod would be and the ball should drop out where the barrel would be if you turn the whole thing upside down a few times), you need to adjust the angle that your qloader socket is mounted at. Loosen the bolt shown in step 5 and play with this until you can get the ball to feed by itself. Any resistance at all is going to bite you during a game, so take your time and make sure you get this right. Some tricks that I used are to scallop the plastic mounting cup and remove some sections of the feed tube itself to help with feeding. This isn't necessary, but I did it as insurance to really open up the passage for balls to feed through.
When you can get a ball to flop all the way through your setup with just gravity, you're ready to move to the next step.
Step 7:
Okay now that you have a qpod full of paintballs and you know your setup is feeding smoothly, we're going to test the feeding of the qloader with paint. Your SP-8 should still be stripped down to just the clamshell and the qloader socket. Grab a spare 140round tube and put the barrel end of your SP-8 clamshell into it. This is to catch the balls as they come out as shown below:
You'll want to stick your index finger over the feed tube like I have mine in the picture. This is to guide the balls downward so they don't get jammed on the SP-8 body and also you don't really want the paint to just feed freely without any resistance. Now insert your pod and the entire qpod should feed smoothly right into the 140round tube.
If it didn't feed freely (ie you get some jams), back to step 6 for you. If it did feed freely, but there are still balls left in your qpod, dissassemble the qpod and add a wind or two then repeat step 7. When you've finally got it feeding so that no more balls are left in your qpod, you have a good starting point for how many winds to wind up all of your pods with.
Step 8:
Now that you have a baseline for number of winds, go ahead and wind up all of your pods with that number of winds (I use 14 myself). Bear in mind that each spring is different so you'll still need to test every single qpod in Step 7. Not doing this step in the convenience of your living room will again just lead to frustration on the field so do it!
Congrats and enjoy. Add a little paint for that personal touch (optional)
Review
Okay now that we have installation out of the way, onto the review part. I'm going to skip talking about the Qloader itself as there are lots of other reviews out there. What we'll be discussing here is going to be SP-8 mod kit specific only.
When I broke down and purchased this kit, I was afraid of two things.
- Would my right hand profile stick out a lot more with this side setup?
- Would left to right balance be thrown off?
When I first got it all put together, I noticed that the balance wasn't thrown off at all and in fact, there was much less of a top heavy feeling to the marker (feeling of wanting to rotate when held). During play, the feeling is non-existant, even after trudging around during a long 2 day scenario and the front to rear gun balance is just fine as well. In fact it's a lot better than other markers I've owned/used.
Next I stood in front of a mirror and checked my right hand profile. I was pleased to see that the qpod didn't stick out past my shoulder/elbow even with my arm tucked all the way in. I'm 5'10 ~150lbs and it's about even with my shoulder/arm if I stand with my shoulders as parallel as possible to the line of fire.
In play, having the hopper out of my line of vision is a HUGE improvement. People who are on point will really appreciate the added peripheral vision to the right when you have your gun up as the SP-8 hopper location really blocks a lot of the field of view when your marker is up and leveled. The mounting socket is also rock solid and doesn't rotate at all. I've done all sorts of evil things to the mounting socket (had one guy even step on it momentarily on accident) and it just springs right back to original location and doesn't get twisted or even worse break. Also, many of the complaints of ball breaks or getting hit in the feed tube are nearly non-existant as the feed tube length is so short. If you've wound up your qpods as outlined above, you most likely have the minimum number of winds for every pod and paintball dimpling should be kept to a minimum. I did notice some dimpling so I'm not sure if a qloader setup is all that great for the one shot snipers out there, but for the rest of us it wasn't too severe and it's generally only the balls that remain in the feed tube for a long time that end up dimpled. All in all I think the SP-8 mod kit quality and construction are top notch. As for the qloader itself, the increased field of vision and elimination of having to use a 45deg elbow are HUGE, but the system adds a lot of complexity and may not be for everybody.


 Saepe Exertus,Semper Fidelis,Frater Infinitas


